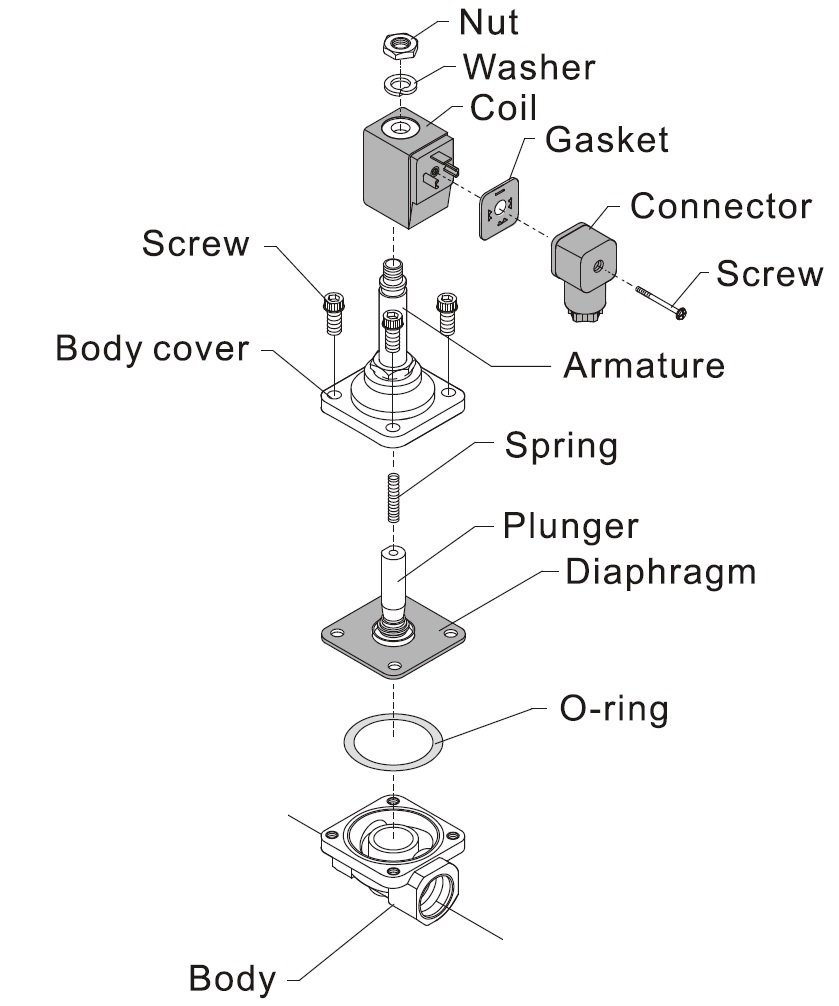
Solenoid Valve Installation and Maintenance Guide
Proper installation and maintenance of a solenoid valve are essential for ensuring long-term reliability and performance. Follow this comprehensive guide for detailed instructions on mechanical setup, electrical connections, operational temperature management, and preventive maintenance.
1. Solenoid Valve Installation Guidelines
Before installing a solenoid valve, ensure compatibility with system requirements.
Verify Valve Specifications
Check the model, supply voltage (V), and frequency (Hz) to confirm they match your system's specifications.
Ensure compliance with any regulatory or industry-specific standards relevant to your application.
2. Mechanical Installation Instructions
Correct mechanical setup ensures optimal fluid control and prevents early failure.
Follow the Flow Direction
Align the valve with the flow direction indicated by an arrow or by the markings “1” (inlet) and “2” (outlet).
Remove Protective Caps
If protective caps are installed, remove them prior to assembly to avoid flow obstruction.
Prevent Contamination
During installation, avoid allowing dirt, PTFE tape, or metal shavings to enter the valve.
Correct Valve Positioning
Install the valve with the solenoid coil in an upright position for best performance.
Horizontal coil mounting is acceptable but may trap debris, reducing valve functionality.
Do not mount the coil downward.
Allow Maintenance Clearance
Ensure sufficient space around the valve for easy future servicing or coil replacement.
Avoid Improper Tightening
Do not use the coil or valve tube as leverage during installation to prevent damage.
Use Filters in Dirty Systems
Install a filter upstream of the valve in systems containing sludge, debris, or particles.
Support Mounting
Only use the pre-drilled mounting holes on the valve. Do not modify the valve body.
Welding Connections
For valves requiring welded connections, refer to the temperature and welding precautions in Section 4.
3. Electrical Connections for Solenoid Valves
Correct electrical setup is crucial for safe and efficient valve operation.
Confirm Voltage Before Wiring
Ensure the supply voltage matches the coil’s rated voltage.
Grounding
Connect the earth (ground) terminal if required.
Coil Installation Precaution
Do not energise the coil before it’s fully installed on the valve to prevent burnout.
Coil Positioning
Adjust the coil position by loosening the top nut, then secure it tightly after adjustment.
4. Temperature and Welding Considerations
Proper heat management extends valve life and prevents damage during installation.
Coil Temperature During Operation
A moderate rise in coil temperature to +40 to +90C is normal.
If smoke or a burning smell is detected, disconnect the power immediately.
Avoid External Heat Sources
Do not install near heaters, boilers, or poor-ventilated areas that may trap heat around the coil.
Do not wrap the coil in insulating materials that would trap heat generated by the coil.
High-Temperature Installations
For environments with extreme temperatures or special safety requirements, consult a technical specialist.
Welding Instructions for Valve Connections
Remove the coil before welding any valve connections.
Ensure the valve body temperature does not exceed 100°C–150°C (200°F–300°F).
Do not let the welding flame touch the valve directly.
Wrap the valve in a wet cloth to dissipate heat, or dismantle internal components if cooling is not possible.
5. Solenoid Valve Maintenance Procedures
Routine maintenance ensures operational efficiency and system safety.
Safety First
Disconnect the power supply and depressurise the system before servicing.
Cleaning and Inspection
Remove, clean, and inspect all internal components.
Replace any worn parts with original spare parts.
Reassembly
Reassemble with care, ensuring all parts are correctly aligned and sealing surfaces are intact.
Final System Check
Test the valve for leaks and correct operation before returning the system to service.
6. Important Safety Warnings
General Disclaimer
These are general guidelines and do not replace manufacturer-specific installation manuals. Always consult original documentation for product-specific requirements.
ATEX Compliance
Never touch or service a valve in a potentially explosive (ATEX) area without prior risk assessment.
Consult an ATEX certified engineer before conducting any electrical work in hazardous zones.

You can download a PDF copy of our general Solenoid Valve IOM Manual
