How to Measure Thread Size A Practical UK Guide
We’ve all been there – a project grinds to a halt because a replacement screw or bolt is just slightly off. It’s a frustrating experience, but figuring out the right thread size is simpler than you might think once you know what to look for.
To get it right every time, you really only need to pin down three key things: the major diameter, the pitch (or thread count), and the length. Get those three sorted, and you'll find a perfect match every time.
Your First Step in Thread Identification
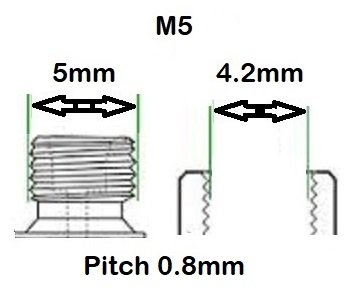
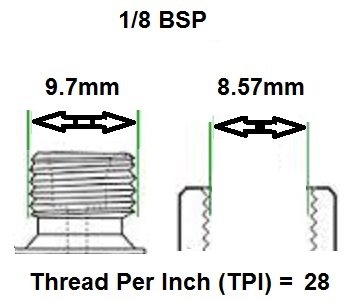
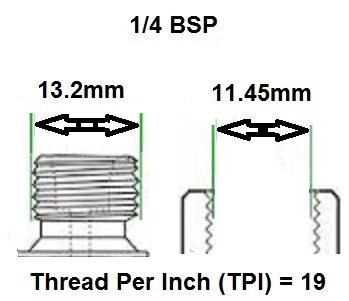
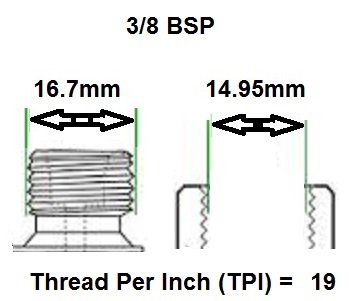
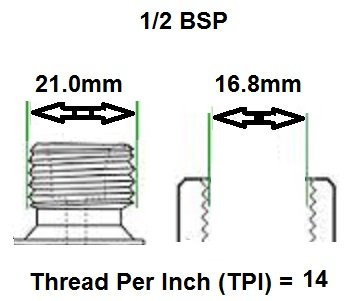
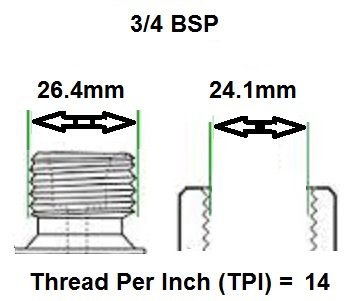
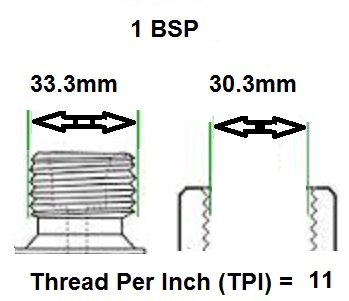
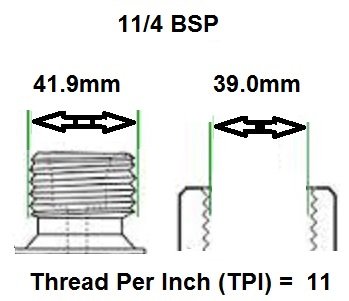
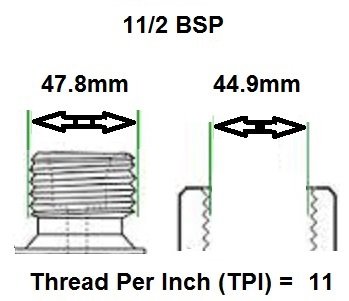
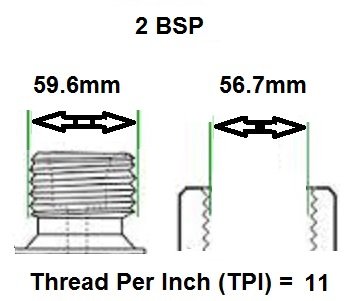
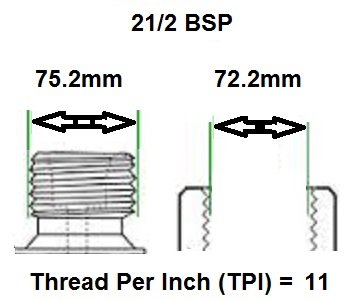
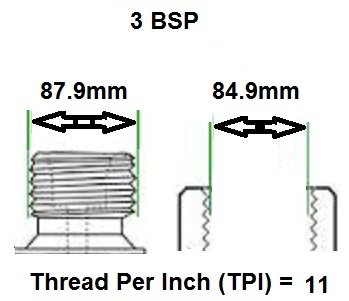
Click any thread image to view solenoid valves by thread size


View all Sub Base / Manifold mounted valves
View all Sub Base / Manifold mounted valves
View all Valves with Hose barb/ tail ends
View all NAMUR Mount Valves
View all valves with 90 degree / right angle inlet to outlet
View all valves with push git or compression ends.
View all valves with Solder Welded ends.
Search all valves online by size.
Before you even grab your calipers, take a moment to understand what you're dealing with. Here in the UK, you’ll mostly come across two systems for threaded fasteners: the modern Metric standard and a few older Imperial standards. Knowing which system you're working with is the first and most critical step.
A mismatched fastener isn't just an inconvenience; it can strip the threads on expensive equipment, causing leaks, weak connections, or even a complete structural failure. This is especially vital when you're working on something precise like a solenoid valve or restoring classic machinery where original parts are gold dust.
Metric vs Imperial Systems
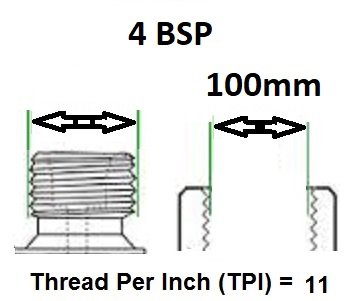
The quickest way to tell the two apart is by looking at how their pitch is defined. Metric threads measure the distance between threads in millimetres (mm), whereas Imperial threads count the number of Threads Per Inch (TPI).
- Metric (ISO): This is what you’ll find on almost all modern equipment, from the furniture you assemble at home to the parts in your car. The measurements are logical and based on millimetres. An "M8" bolt, for example, has a nominal diameter of 8 mm. Simple.
- Imperial (BSW, UNC, etc.): These are the older systems still kicking about in classic British machinery, some plumbing fixtures, and a lot of gear imported from the US. Standards like British Standard Whitworth (BSW) or Unified National Coarse (UNC) use fractions of an inch for diameter and TPI for the pitch.
A quick visual check can often give the game away. I've found that Metric threads tend to have a sharper, more defined "V" shape. On the other hand, some of the classic Imperial threads like BSW have a noticeably more rounded profile at the top and bottom of the thread.
To make things clearer, here’s a quick comparison of the fundamental differences you'll encounter.
Metric vs Imperial Threads At a Glance
The table below breaks down the core differences between the two main thread systems you'll find in the UK.
| Feature | Metric Threads (ISO) | Imperial Threads (BSW, UNC) |
|---|---|---|
| Diameter | Measured in millimetres (e.g., M10) | Measured in inches (e.g., 3/8") |
| Pitch | Distance between threads in mm (e.g., 1.5mm) | Threads Per Inch (TPI) (e.g., 16 TPI) |
| Thread Angle | Typically 60 degrees | Can vary; BSW is 55 degrees, UNC is 60 degrees |
| Common Use | Modern machinery, automotive, electronics | Classic cars, older plumbing, some US equipment |
Getting your head around this distinction is the foundation you need to measure any thread with confidence. Once you know whether you're working in metric or imperial, the rest of the process becomes much more straightforward.
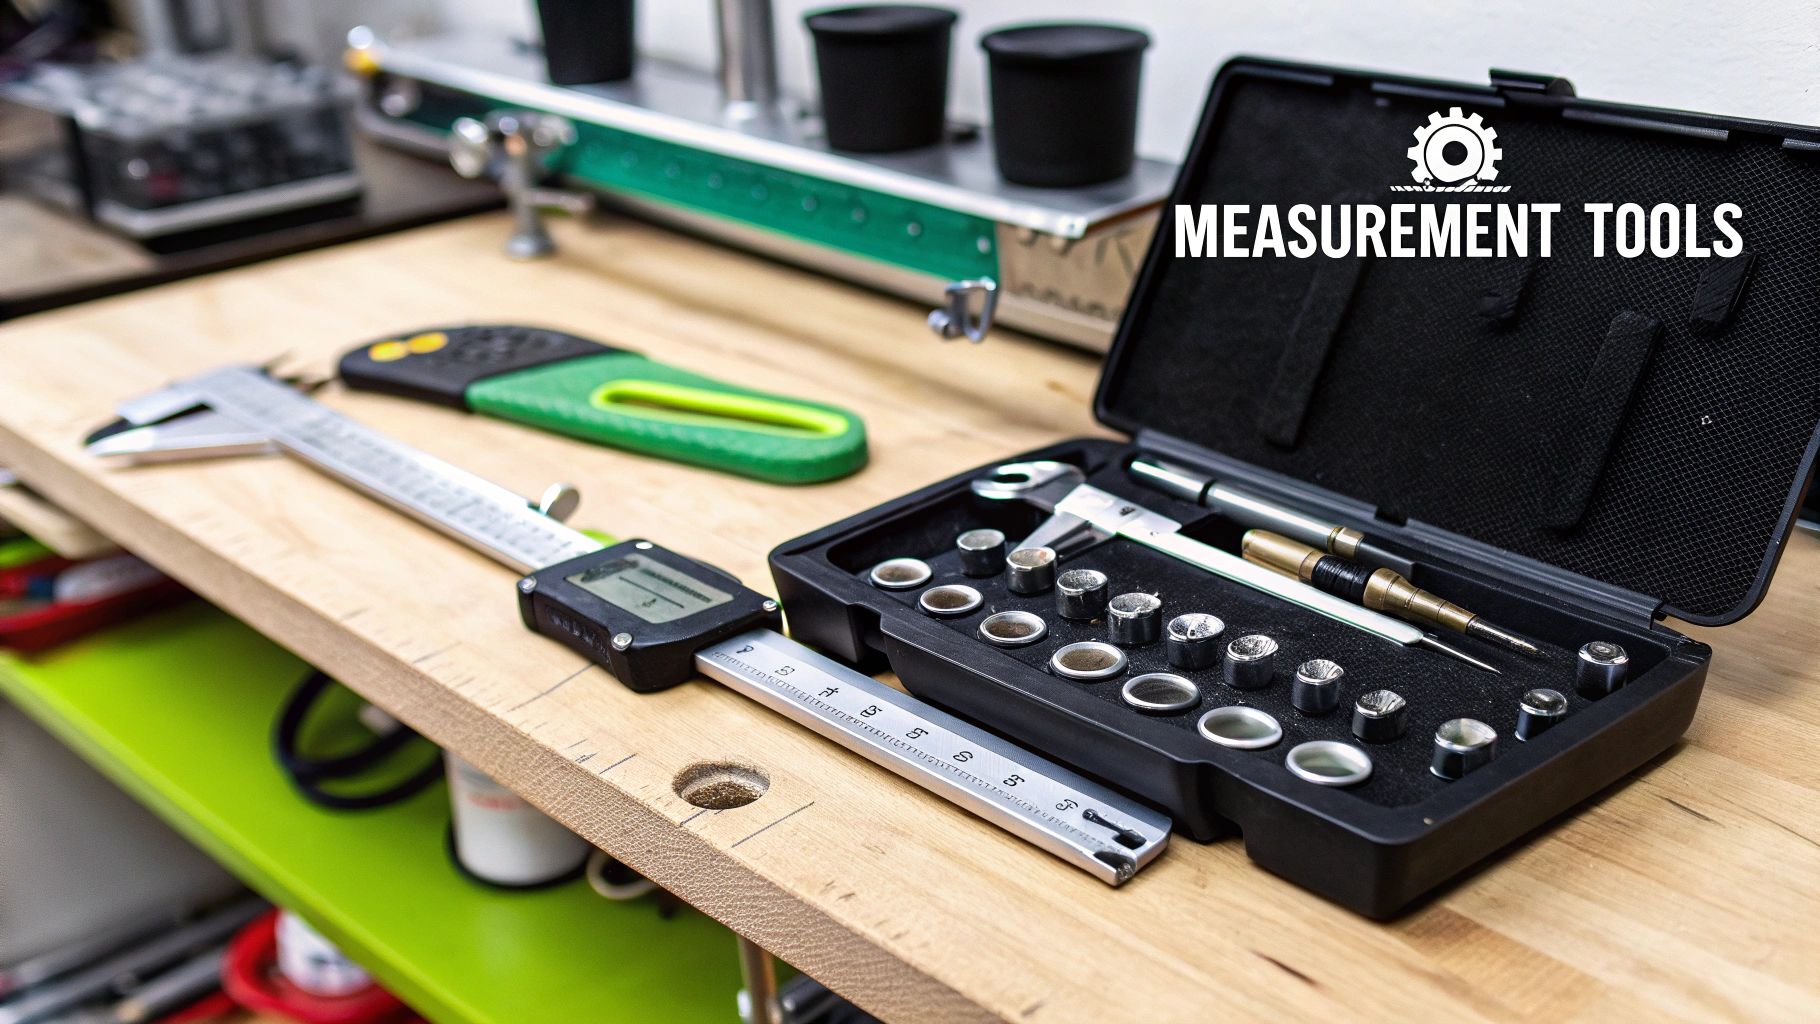
Essential Tools for Accurate Measurement
If you want to measure a thread properly, guessing just won't cut it. While you might get a rough idea with a standard ruler, turning that guesswork into a precise science requires the right equipment. Trust me, investing in a few specialist tools will save you from countless headaches and costly mistakes down the line, whether you’re a DIY enthusiast or a seasoned professional.
For your workshop, there are three absolute must-haves: a set of digital calipers, a thread pitch gauge, and a good old-fashioned ruler. Each one has a specific job to do, and together they’ll give you all the dimensions you need to identify any fastener correctly.
The Core Toolkit
Your number one tool here is going to be digital calipers. This is what you’ll reach for to get a highly precise measurement of a screw or bolt's major diameter. You can also flip it around and use the inner jaws to get a spot-on reading of a nut's internal diameter. They are simply far more reliable than a ruler for this kind of detailed work.
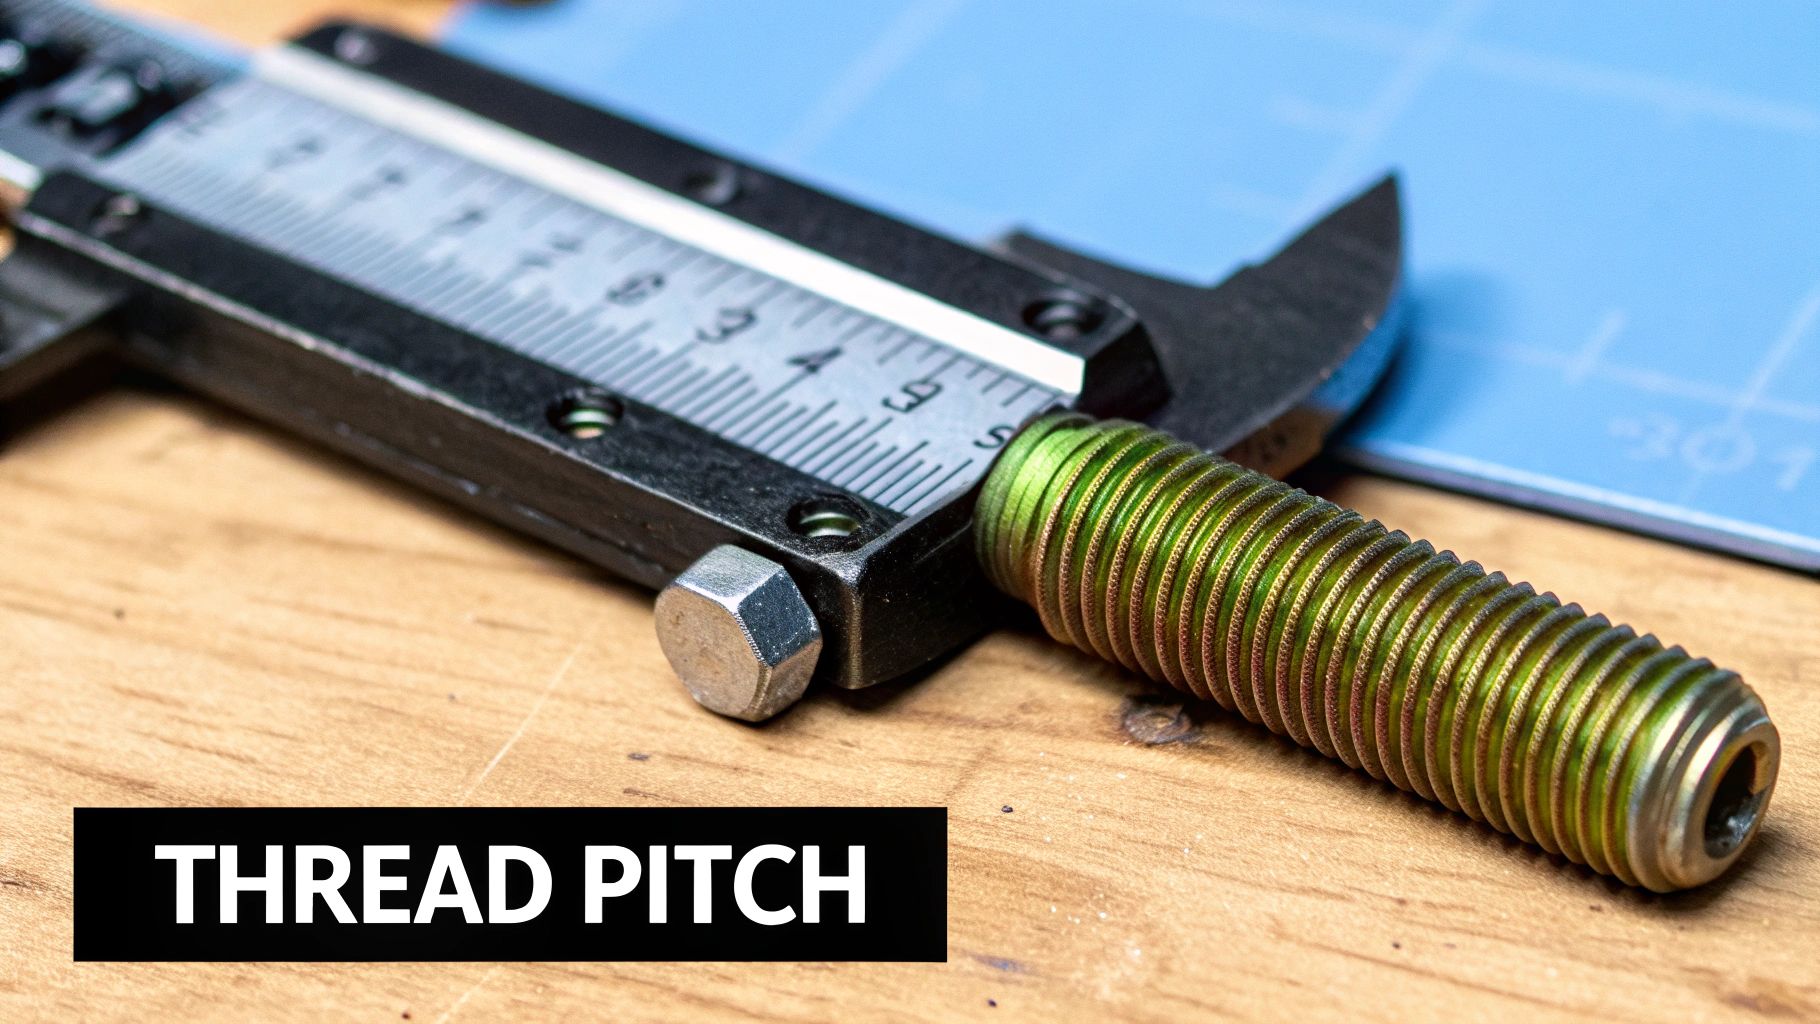
Next up, you'll need a thread pitch gauge. It looks a bit like a fan and is made up of multiple 'leaves', each one cut with a different thread pattern. You just cycle through the leaves until you find one that sits perfectly in your fastener’s threads. This little tool quickly tells you the pitch (for metric threads) or the TPI (Threads Per Inch) for imperial sizes.
And finally, don't discount the humble ruler or measuring tape. It's still the best tool for the simple but crucial job of measuring the overall length of a bolt or screw. For many jobs, this measurement is just as important as the diameter and pitch.
A quick tip from my own experience: the most common mistake I see is people applying too much force with their calipers. You want the jaws to just kiss the threads, not clamp down on them. Squeezing too hard can actually compress the metal and throw your reading off.
Here in the UK, our methods for measuring thread sizes have come a long way, especially with the development of standards like British Standard Whitworth (BSW). This history has really driven the need for precision tools to measure key factors like the major diameter (the widest part of the thread) and the pitch (the gap between threads) to guarantee a proper, secure fit.
When you use these three tools together, you're set. The calipers give you the diameter, the gauge provides the pitch, and the ruler confirms the length. With that information, you can identify pretty much any thread you come across with total confidence.
How to Confidently Measure Thread Diameter
When you're trying to identify a thread, the first and most important measurement you’ll take is its diameter. Get this right, and you're already halfway to finding a perfect match, whether you're working with a chunky industrial bolt or a tiny precision screw. All you need is a good set of digital calipers.
For male threads, like you’d find on a bolt, what you're looking for is the major diameter. You’ll measure this by gently closing the caliper’s outer jaws across the widest part of the threads, from the very peak of one side to the peak of the other. The trick here is a light touch. If you squeeze too hard, you can actually compress the metal just enough to throw off your reading.
When it comes to female threads, like those inside a nut or a tapped hole, you'll switch to the caliper's inner jaws. Carefully insert these smaller jaws into the opening and expand them until they make firm, even contact with the threads. This measurement will give you the internal diameter.
The image below shows exactly how to position your calipers to get an accurate reading on a bolt's major diameter.
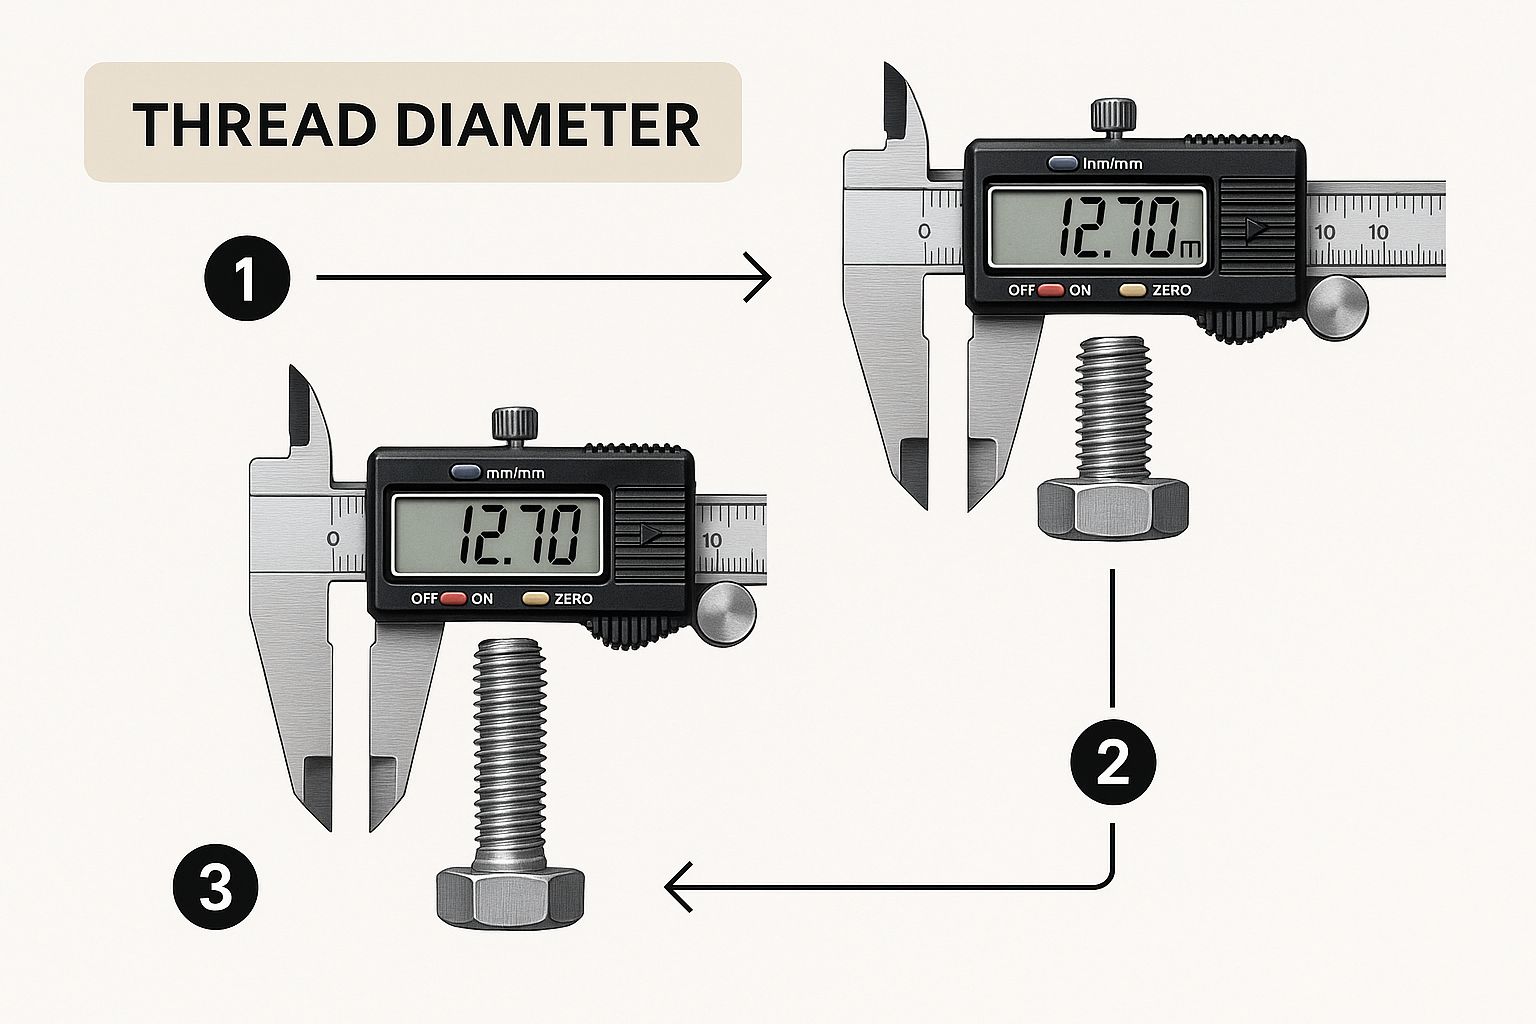
As you can see, the jaws are sitting right on the peaks of the threads. Getting this placement right is key to getting a measurement you can trust every single time.
Pro Tips for Precision
A single measurement is a good start, but it might not be the full story, especially with older fasteners that have seen a bit of wear and tear. Consistency is what leads to real accuracy.
- Measure multiple spots: Don't just measure once. Take readings at a few different points around the thread’s circumference.
- Rotate and re-measure: Give the fastener a quarter turn and measure it again. This helps account for any slight imperfections or if the part is a little out of round.
By taking a few different readings and calculating the average, your final number will be much more reliable. This simple habit has saved me from countless headaches and trips back to the parts bin, especially when dealing with components that have been in service for years. An accurate diameter solves the first half of the puzzle.
If you want to dive deeper into this, you can find more detail by measuring threads in our other guide. Once you have a solid diameter measurement, the next step is to find the pitch—which we'll cover next—and you'll be able to identify any fastener with total confidence.
Nailing the Thread Pitch and Count
Once you’ve got the diameter sorted, the next crucial piece of the puzzle is the thread pitch. This single measurement is what truly sets one fastener apart from another, even when their diameters seem identical. Getting this right is completely non-negotiable if you want a secure, leak-proof fit.
The most reliable way to figure this out is with a thread pitch gauge. It’s a simple, indispensable tool that looks a bit like a fan of metal leaves, and it takes all the guesswork out of the equation. All you have to do is find the one leaf that fits perfectly into your fastener’s threads.
Using a Thread Pitch Gauge
First, grab the gauge that matches the system you think you’re working with—either metric or imperial. Press the teeth of one of the leaves firmly against the bolt’s threads. If you can see any daylight peeking through, that’s not the one. Keep cycling through the leaves until you find one that meshes absolutely perfectly, with no gaps at all.
The number stamped on that winning leaf is your answer. For metric threads, this number is the pitch—the exact distance in millimetres from one thread crest to the next (for example, 1.25mm). For imperial threads, it gives you the Threads Per Inch (TPI), such as 18 TPI.
A classic real-world mix-up is confusing an M8x1.25 metric bolt with a 5/16"-18 UNC imperial one. Their diameters are incredibly close (~7.9mm vs. 7.94mm), making them very easy to mistake visually. But their pitches are miles apart, and a thread gauge will spot the difference in seconds.
Understanding these thread systems is especially vital in fluid and gas control, where a perfect seal is everything. You can see just how critical pitch and thread angle are in our detailed guide on the differences between NPT and BSPT threads.
What If You Don't Have a Gauge?
Found yourself without a pitch gauge? Don’t worry, there's a handy trick you can use for imperial bolts. Just lay a ruler flat against the threads, mark out a one-inch section, and carefully count the number of thread peaks within that inch. That number is your TPI.
It’s not quite as precise, especially for very fine or metric threads, but it's a brilliant backup for larger bolts where the threads are easier to count. Combine an accurate diameter with the correct pitch, and you can confidently identify just about any thread you come across.
Navigating UK Thread Standards, Both Old and New
When you're trying to figure out a thread size here in the UK, it pays to know a bit of the backstory. We're not just dealing with modern standards; we have a rich industrial history that still pops up in everything from classic cars and old plumbing to workshop machinery. Understanding this context makes your life a lot easier when it comes to identification.
Most new equipment you’ll come across will use the straightforward ISO Metric standard. Simple enough. However, the UK is also home to several legacy thread systems that you just can't ignore. These aren't just museum pieces—they're still very much in use.
The Legacy of British Standards
The most well-known of these is the British Standard Whitworth (BSW). Its arrival was a genuine turning point for manufacturing. Before Joseph Whitworth introduced it back in 1841, every workshop had its own system, which meant parts were never interchangeable. Whitworth changed all that, creating a unified system with a distinct 55-degree thread angle and specific TPI counts, solving massive headaches in assembly and repair. You can read more about this groundbreaking standard and its impact on Wikipedia.
Along with BSW, you'll also bump into Unified threads (UNC/UNF). These are very common on American-made equipment and often act as a sort of bridge between UK and US engineering. The main thing to remember is that these older standards often have different thread angles compared to the 60-degree profile of modern metric threads.
One of the most common mistakes I see is someone trying to force a metric bolt into a BSW hole. The diameters can be deceptively similar, but the difference in thread angle—55 vs 60 degrees—will cause instant cross-threading and damage both the bolt and the hole.
Recognising these differences is absolutely vital. For instance, in any fluid system where a perfect seal is crucial, understanding the unique profiles of various global standards is non-negotiable. For a much deeper look into this, have a look at our guide on BSP, NPT, and other worldwide thread standards.
Ultimately, having a good idea of which system you’re likely up against—whether it's a modern metric or a historic imperial type like BSW—is your first step towards getting an accurate measurement. It gets you on the right track before you even pick up your callipers.
From Measurement to Final Identification
You've got your diameter and pitch measurements in hand, but let's be honest, those numbers are pretty useless on their own. The real magic happens when you put them together to finally figure out exactly what fastener you're dealing with. This is where you translate raw data into a solution.
By combining those two key readings, you can turn to a standard thread identification chart to find a perfect match. These charts are an absolute godsend, and I can't recommend enough that you keep a printed copy somewhere in your workshop. They cross-reference the diameter with the pitch (or TPI), letting you pinpoint the precise standard and size in seconds.
Putting It All Together In Practice
Let's walk through a couple of real-world scenarios you've probably faced before. Maybe you're putting together some flat-pack furniture and, inevitably, you drop and lose a crucial bolt.
- The Furniture Bolt: You grab your calipers and measure the diameter, getting a reading of 7.9mm. Next, you use a metric pitch gauge and find the 1.25mm leaf fits the threads perfectly. A quick glance at your chart confirms these two numbers mean you're looking for a standard M8 x 1.25 metric bolt. Problem solved, and you can get on with your day.
- The Classic Car Fastener: Now, let's say you're tinkering with an old British sports car. You measure a bolt and get about 9.4mm (which is roughly 3/8") on the callipers. The imperial gauge tells you it has 24 threads per inch (TPI). Your chart will show this is a 3/8"-24 UNF bolt, a very common fine thread you'll find all over classic automotive jobs.
This whole process shows exactly why you need both measurements. A diameter around 8mm could easily be an M8, but it could also be a 5/16" imperial bolt. Only by checking the pitch can you be 100% sure you have the right one and avoid the nightmare of cross-threading a part.
With these steps, you can confidently move from measuring a mystery fastener to knowing precisely what it is. You're no longer just looking at numbers; you understand what they actually mean.
Common Questions About Measuring Threads
Even with the right tools in hand, some situations can leave you scratching your head. Let's tackle a few of the common puzzles that pop up when you're trying to pin down a thread size here in the UK.
What if My Measurement Is Between Two Sizes?
This is a classic problem, especially when you're working on older machinery or well-used parts. If your reading consistently falls between two standard sizes on your chart, the first thing to do is double-check your measurement. A consistent ‘in-between’ reading is a big clue that you’re dealing with a worn thread that has lost a bit of its original material over the years.
Of course, there are other possibilities. You might have stumbled upon a less common or specialised thread standard. It's also worth considering if it could be a US-standard fastener (like UNC/UNF), as their dimensions can be frustratingly close to some Metric or BSW sizes.
Can I Measure a Thread with Just a Ruler?
In a pinch, you can get a rough idea of the diameter and length with a standard ruler, but it really lacks the precision you need for the pitch. For imperial threads, it's sometimes possible to manually count the number of threads over one inch (TPI), but this becomes incredibly difficult and unreliable on finer or smaller fasteners.
A thread gauge is always the best tool for the job when it comes to pitch. For the small investment, it completely removes the guesswork. Trust me, it prevents the kind of costly damage that happens when you force the wrong fastener, and it's one of those tools you'll be glad you have every single time you reach for it.
Does It Matter if I Use a Plastic or Metal Caliper?
Yes, it makes a huge difference. Metal calipers, typically made from stainless steel, give you far greater accuracy, durability, and consistency than their plastic cousins.
For any serious mechanical or engineering work, a quality set of metal digital or vernier callipers is an essential bit of kit. Plastic callipers might be okay for non-critical tasks where a 'close enough' measurement will do, but they simply don’t have the precision required to correctly identify most threads.
For all your fluid control needs, from standard fittings to specialised certified valves, Solenoid Valve World has the components and technical support to keep your systems running perfectly. Find the exact part you need at https://solenoid-valve.world.