UK Valve Inspection Checklist for PSSR Compliance
A robust valve inspection checklist is your best defence against equipment failure and falling foul of regulations. It's the only way to systematically guide you through safety preparations, external and internal examinations, and functional testing, making sure every critical point is covered before you put an asset back into service.
Preparing for a Safe and Compliant Valve Inspection
Before you even think about picking up a spanner, the groundwork for a successful inspection must be laid. This first phase is all about creating a safe, controlled environment and gathering the necessary intelligence on the valve.
It’s a common mistake to rush this part, but that can lead to major delays or, far worse, a serious safety incident. It’s not just a box-ticking exercise; it’s about being methodical. Think of it like a surgeon preparing for an operation—they review the patient’s history, ensure all instruments are sterile, and check the team is ready. Your pre-inspection routine is just as foundational to the health of your systems.
Secure the Environment First
The absolute first priority is to isolate the valve from the system. This is non-negotiable and is done using rigorous lock-out/tag-out (LOTO) procedures.
Imagine a scenario in a food processing plant: an engineer starts work on a steam valve without isolating it properly. In another part of the plant, an operator who is completely unaware of the maintenance remotely cycles the system. This simple oversight sends live steam down the line, creating an immediate and severe hazard for the engineer.
Proper LOTO ensures all energy sources—whether they're electrical, pneumatic, or hydraulic—are de-energised and can't be accidentally switched back on. Once isolated, you must safely depressurise the line and, if needed, drain any leftover media. Verifying a zero-energy state is a critical checkpoint before you go any further.
Gather Your Documentation and Tools
With the area secure, it's time to get your paperwork and equipment in order. A valve doesn't exist in a vacuum; it has a history. Having these documents and the right tools on hand gives you essential context that will shape your entire inspection.
Before you begin, it’s good practice to lay out everything you’ll need. This simple step prevents unnecessary trips back to the workshop and keeps the focus on the task at hand.
Pre-Inspection Safety and Documentation Checklist
| Category | Essential Items | Purpose |
|---|---|---|
| PPE | Safety glasses/goggles, hard hat, steel-toed boots, protective gloves (type depends on media), high-visibility vest. | Ensures personal safety from potential physical, chemical, or thermal hazards. |
| Isolation | LOTO kit (locks, tags, hasps). | Physically prevents accidental re-energisation of the system during maintenance. |
| Documentation | Previous inspection reports, manufacturer’s manual, maintenance logs, P&ID drawing. | Provides historical context, operational parameters, and system location. |
| Tools | Wrenches/spanners, torque wrench, cleaning supplies (wire brushes, cloths), flashlight, inspection mirror. | Having the correct tools ready avoids delays and ensures proper disassembly/reassembly. |
Having this organised approach means you’re not just performing a check; you’re conducting a thorough health assessment.
A deep dive into past reports can turn a routine check into a proactive one. For example, if a valve has a history of packing leaks every 12 months, you can look for the root cause this time around, instead of just repeating the last repair.
This preparation phase, governed by UK regulations like the Pressure Systems Safety Regulations (PSSR) 2000, is what transforms a simple visual check into a comprehensive assessment, guaranteeing safety and compliance right from the start.
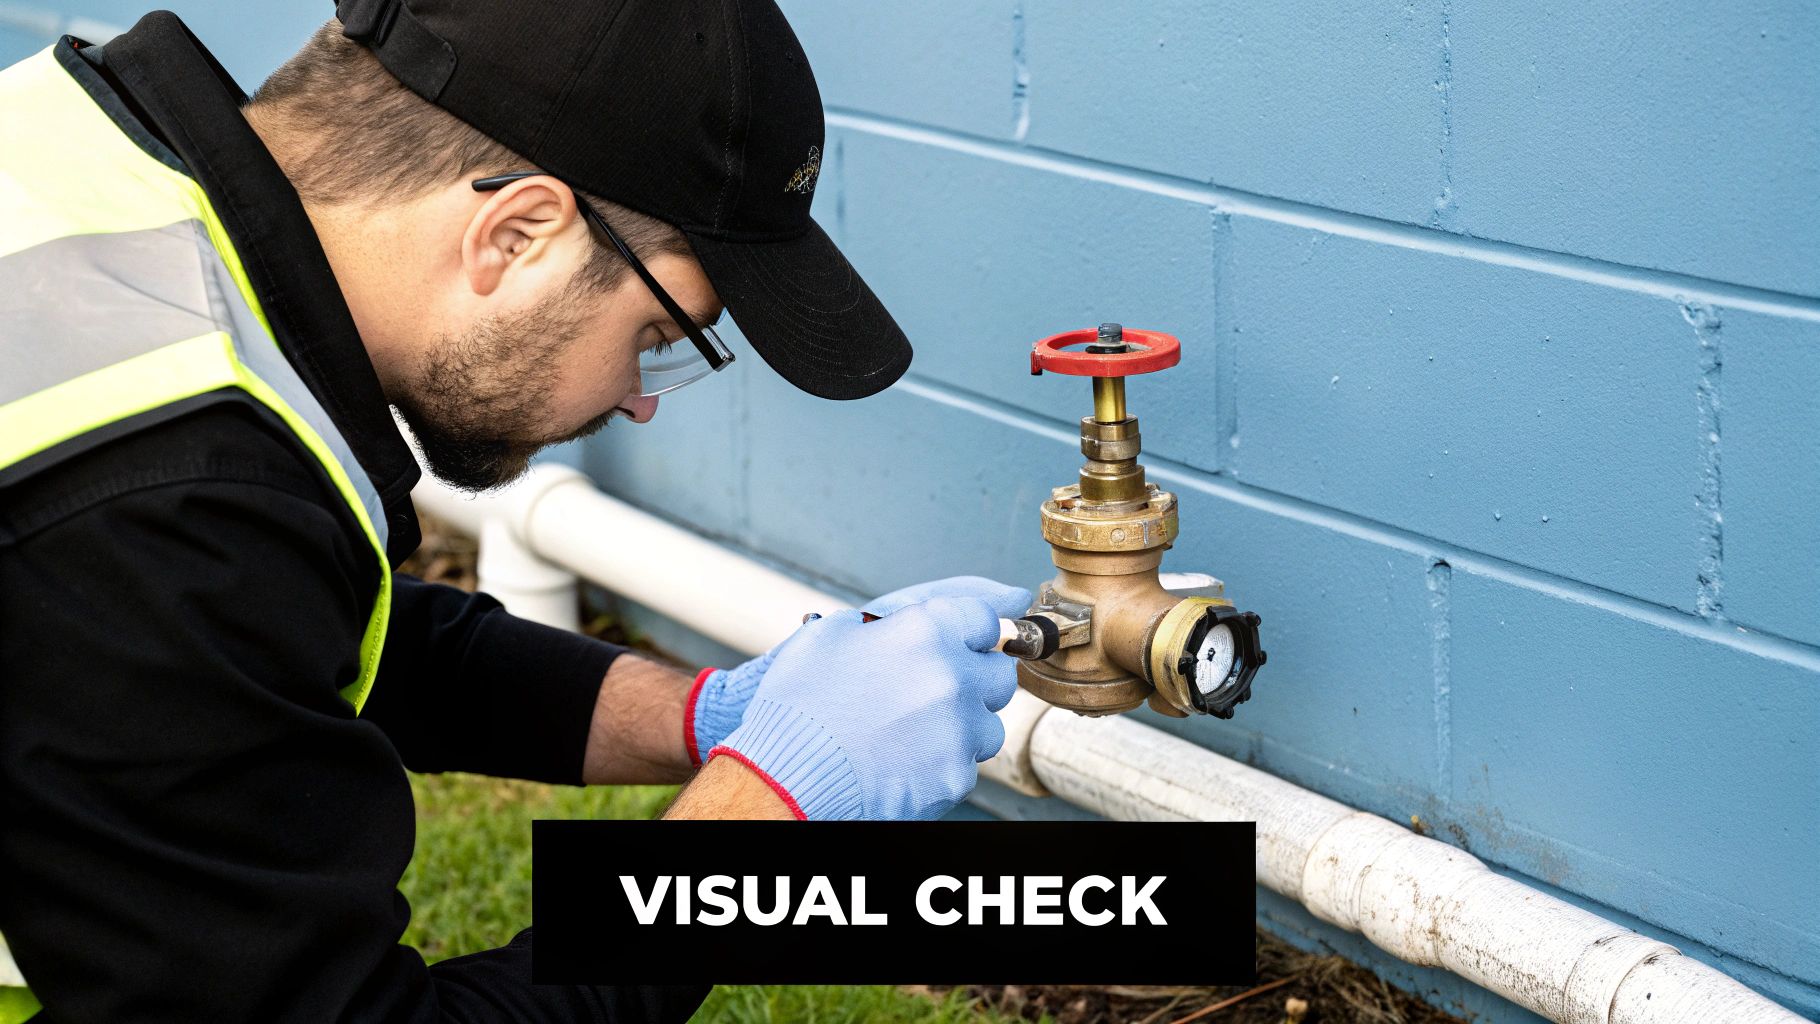
Conducting a Thorough External Examination
Once you've sorted your safety protocols and have the right paperwork ready, it's time to get hands-on. The first real step is a meticulous external review of the valve. This is far more than a quick once-over; it's a diagnostic process. I've seen countless cases where a careful external check flagged serious issues long before a single bolt was loosened. An experienced engineer knows the outside of a valve often tells you a vivid story about what's happening on the inside.
Your inspection should start with a critical, overall look at the entire valve body. You're hunting for both the obvious and the subtle – everything from major cracks in the casting to the smallest signs of environmental wear and tear.
Assessing the Valve Body and Coatings
Zero in on the valve body itself. You're looking for any evidence of corrosion, erosion, or physical damage. That seemingly minor rust spot? It could be the first clue to a slow, persistent leak or a sign that the protective coating has failed, leaving the valve exposed to a corrosive atmosphere.
The condition of the paint or coating is just as critical. These layers aren't just for looks; they are the valve’s first line of defence against the environment. Keep an eye out for:
- Flaking or peeling paint: This is a red flag. It means the metal underneath is exposed to moisture and corrosion is likely not far behind.
- Blistering: This often points to moisture trapped beneath the coating, creating the perfect hidden environment for rust to bloom.
- Chalking or fading: While less urgent, this signals that the coating is breaking down and will soon lose its protective qualities.
This initial sweep sets the stage for a much closer look at the valve's most vulnerable components.
A valve's external condition provides vital clues. Ignoring a small patch of corrosion around a flange is like ignoring a small water stain on a ceiling—it often points to a much bigger, hidden problem that will only get worse.
Inspecting Glands, Flanges and Fasteners
Now, turn your attention to the mechanical connections. The gland packing area is a classic weak spot and a frequent source of leaks. Look for those tell-tale streaks or any crystallised residue which proves that media has been escaping. In the same way, give the flange faces a thorough check for any signs of weeping or gasket extrusion.
The bolts holding the whole assembly together need close scrutiny. Are the nuts and bolts tightened evenly, or do some look suspiciously looser than others? Search for any signs of stretching or heavy rust. Either could seriously compromise the integrity of the pressure boundary. A corroded bolt simply won't have the clamping force needed to hold a seal under pressure.
Finally, you have to confirm the valve’s identity. Find the identification tag and make sure it’s clean and perfectly legible. This tag holds crucial data: model, size, material, and pressure rating. Most importantly, the serial or asset number must line up with your system records. This traceability is a non-negotiable part of any robust valve inspection checklist.
Here in the UK, this traceability is fundamental for compliance. Safety regulations insist that every safety valve is uniquely identified to track its entire history, from performance to its fitness for continued service. Based on its condition and performance history, you can even adjust the inspection frequency, which helps to optimise maintenance schedules without ever compromising on safety. You can find more details on the UK-specific regulatory framework and guidance on safety valve examination requirements from SAFed.
Assessing Internal Valve Components
Once the valve is safely isolated and on the bench, it’s time to get to the heart of the matter: the internal components. This is where the real detective work begins. The condition of these parts is what separates a reliable valve from a potential system failure. A thorough look inside is a non-negotiable part of any serious valve inspection checklist.
The internal surfaces tell a story about the valve's life in the line. You're looking for the tell-tale signs of wear and tear that can compromise its ability to shut off tightly. This isn't just a quick look-see; it’s a methodical, piece-by-piece examination.
Examining Sealing Surfaces for Wear
First things first, let's look at the primary sealing components: the disc (or ball/plug) and the seat. These two are the dynamic duo responsible for stopping the flow. You need to inspect their mating surfaces with a fine-tooth comb for any damage that could create a leak path.
Keep an eye out for these common culprits:
- Pitting: These are small, localised corrosion cavities. They might look minor, but they can grow quickly and lead to significant leakage.
- Erosion: Does the surface look like it's been sandblasted? That's erosion, often caused by high-velocity flow or abrasive particles in the media.
- Scoring or Galling: These are deep scratches or grooves. Usually, this means some foreign debris got trapped between the seat and disc as it closed. A classic rookie error.
- Wire Drawing: This one is distinctive. It looks like a fine, thread-like groove cut into the seating surface. It's the calling card of high-velocity gas or steam leaking through a tiny gap.
Even tiny imperfections on these surfaces can torpedo your chances of a bubble-tight seal. Here’s a pro tip from the field: run your fingernail across the surface. If you can feel a groove, it’s big enough to cause a problem and will need lapping at a minimum, or more likely, a full replacement.
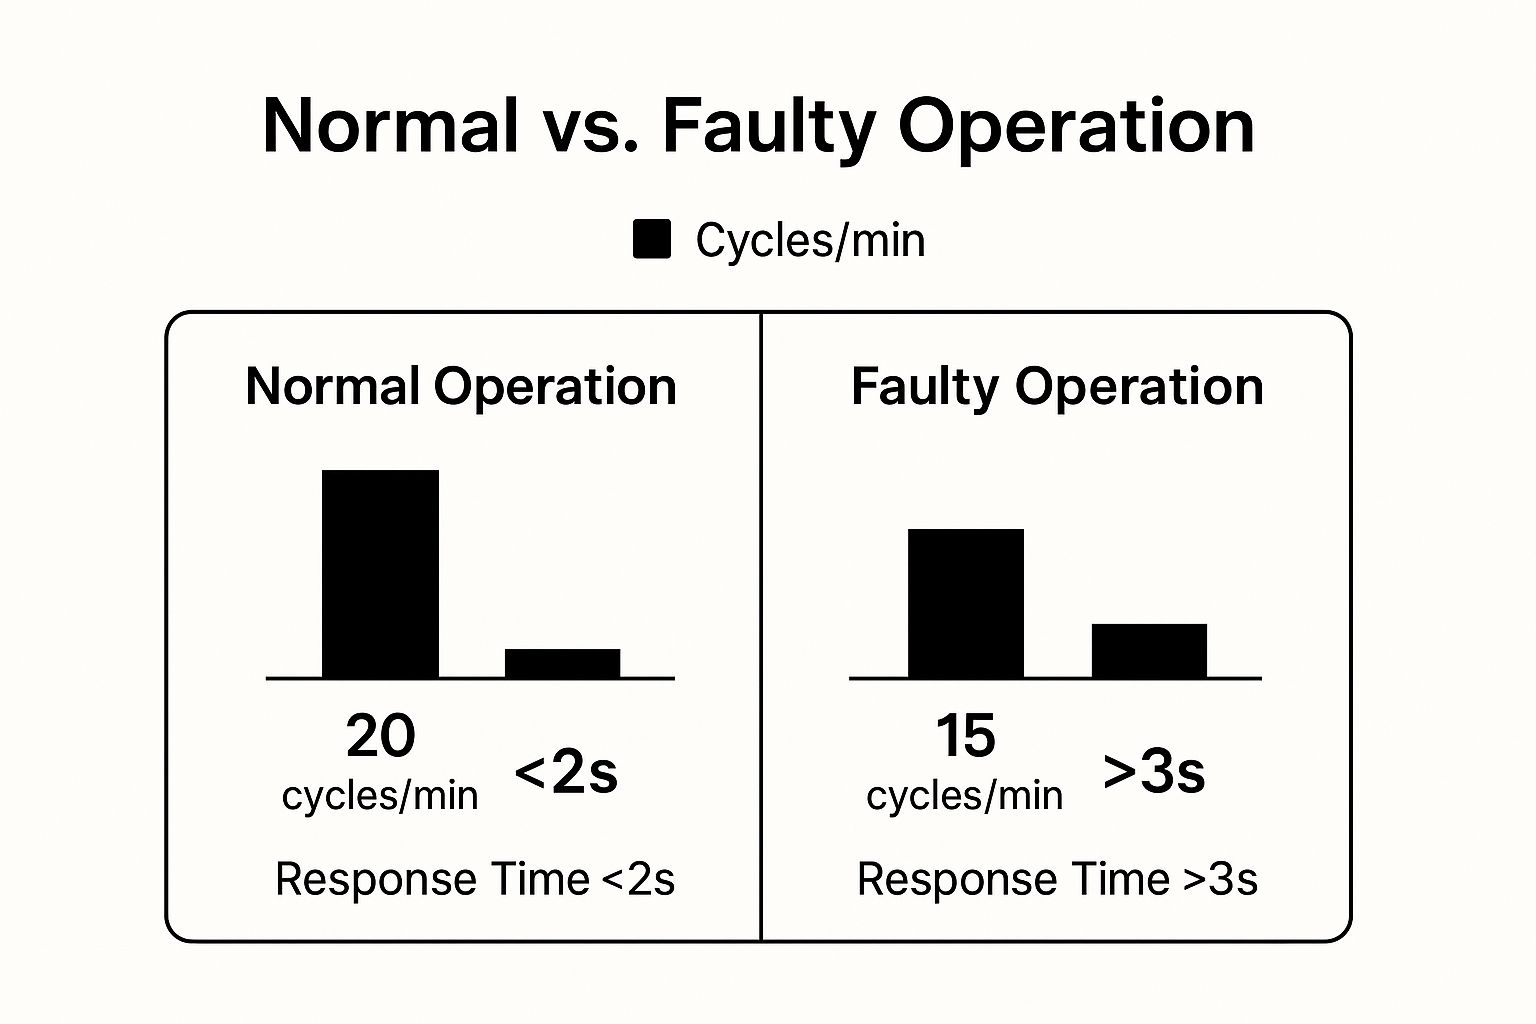
This data shows a clear link between component health and performance. As you can see, a valve's ability to actuate quickly and efficiently is often the first casualty of internal wear.
Checking the Stem and Packing Integrity
Next up is the valve stem. Check for straightness by rolling it on a perfectly flat, clean surface. Any wobble, no matter how slight, is a red flag. A bent stem puts uneven pressure on the gland packing, which leads to early leaks and makes the valve a real pain to operate.
While you're there, examine the stem surface where it passes through the packing. Any scoring or corrosion here will act like a file, shredding any new packing you install.
Don’t forget the gaskets and packing themselves. Old gaskets often go brittle, losing their sealing power. Gland packing is no different; over time, it can harden and lose the flexibility it needs to do its job.
The decision to repair a part or just replace it is a critical judgement call you'll make constantly in the field. To help guide that decision, here’s a quick breakdown for the most common internal parts.
Internal Component Assessment: Repair vs Replace
| Component | Signs of Minor Wear (Repair) | Signs of Critical Damage (Replace) | Consideration |
|---|---|---|---|
| Disc / Ball | Light surface scratches, minor lappable imperfections. | Deep scoring, pitting, visible cracks, or deformation. | The cost of machining vs. a new part. Safety is paramount. |
| Seat Rings | Minor indentations or wire drawing that can be lapped out. | Deep grooves, cracks, severe erosion, or signs of corrosion. | A faulty seat guarantees a leaking valve. Replacement is often the safer, long-term bet. |
| Stem | Light scoring that can be polished out without affecting diameter. | Any bend, deep gouges, pitting, or significant thread damage. | A compromised stem affects both sealing and operation. It's a critical safety component. |
| Gaskets/Packing | - | Hardened, brittle, cracked, or chemically degraded. | These are wear items. Always replace gaskets and packing during a major overhaul. The cost is minimal. |
Ultimately, making the right call here is what separates a routine check from a truly effective piece of preventative maintenance.
Deciding whether to repair or replace a component is a crucial judgement call. Minor scoring on a seat might be lapped out, but significant pitting or deep wire drawing almost always requires replacement of the part to restore the valve's integrity and ensure long-term reliability.
Getting these decisions right is how you balance maintenance costs with operational safety, turning a standard inspection into a key part of your asset management strategy.
Putting Valves to the Test: Functional Checks and Leak Detection
A valve that looks perfect on the bench is no good to anyone if it can't handle the pressure. Once you’ve finished the external and internal checks, it's time to move on to the dynamic tests. This is where we separate the reliable valves from the risky ones and prove they're fit for service.
The first thing I always do is a simple stroking test. It's a quick, hands-on check that tells you a lot. For a manual valve, you just move it through its full range of motion, from fully open to fully closed and back again. What you're feeling for is a smooth, consistent movement. Any sticking, jerkiness, or binding is an immediate red flag—it almost always points to an internal alignment problem or a bent stem.
With automated valves, like those driven by an actuator, this test confirms the actuator is responding correctly. It should open and close the valve smoothly and within the time specified on its data sheet. This is especially crucial for systems that rely on precise timing. The performance can vary a lot between different types, so it's worth exploring options like pneumatic solenoid valves to understand how they should behave.
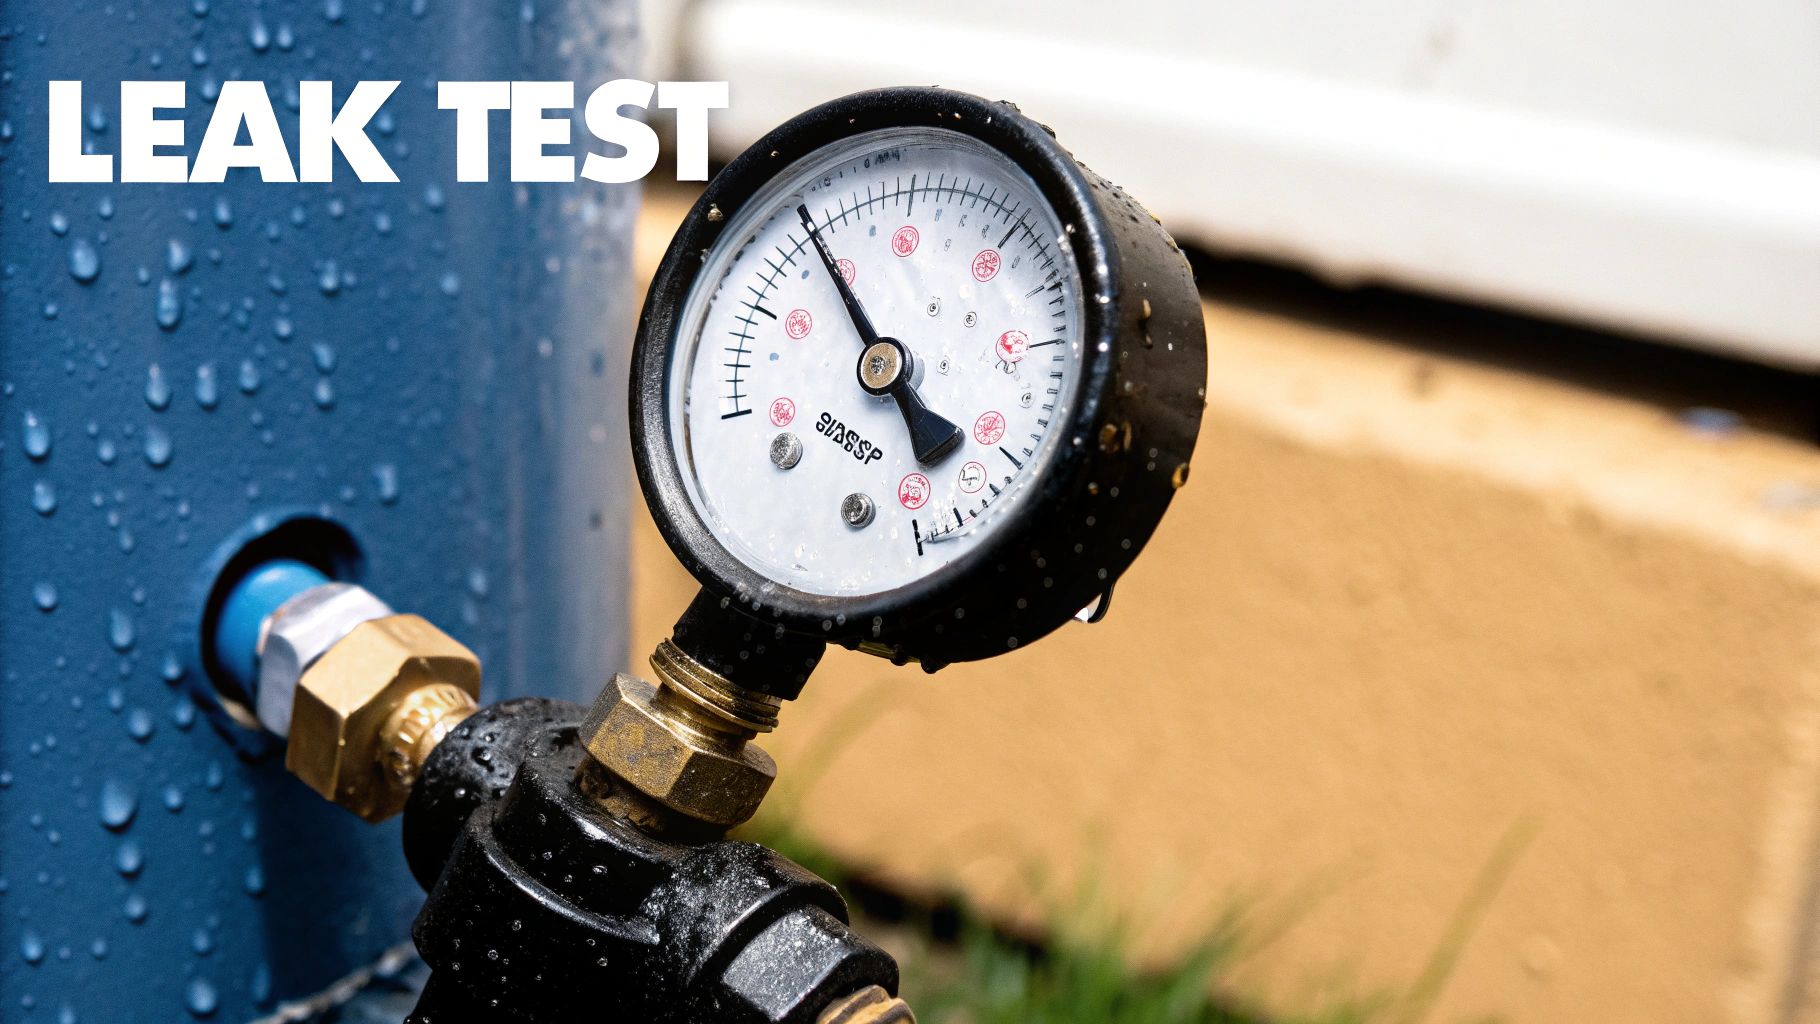
The All-Important Leakage Test
Now for the most critical part: the pressure and seat leakage test. This is the ultimate proof that a valve can hold pressure and achieve a tight shut-off, living up to its specified leakage class. The go-to method for many of us is the bubble test. It’s straightforward: you pressurise the valve with air or nitrogen and check the downstream side for any bubbles emerging from the outlet. It's a simple, visual way to spot a leak.
A valve’s leakage class isn’t just a number on a spec sheet; it's a performance guarantee. Verifying it through a rigorous test is the only way to confidently return an asset to critical service and prevent fugitive emissions or system inefficiencies.
To get results you can trust, you have to get the details right.
- Use calibrated gauges: An inaccurate pressure gauge makes the entire test worthless. Make sure they're in-date.
- Choose the right fluid: The testing fluid or gas must be compatible with the valve’s materials and its intended service.
These tests aren't just good practice; they're often a legal requirement. In the UK, for example, pressure equipment inspections fall under strict standards that depend on the equipment's age and application. Tank vehicles built after May 2004 must follow EN12972, which sets inspection intervals at three years for intermediate checks and six years for periodic ones. These functional tests are how you ensure a valve is not only compliant but, more importantly, safe to operate until its next scheduled inspection.
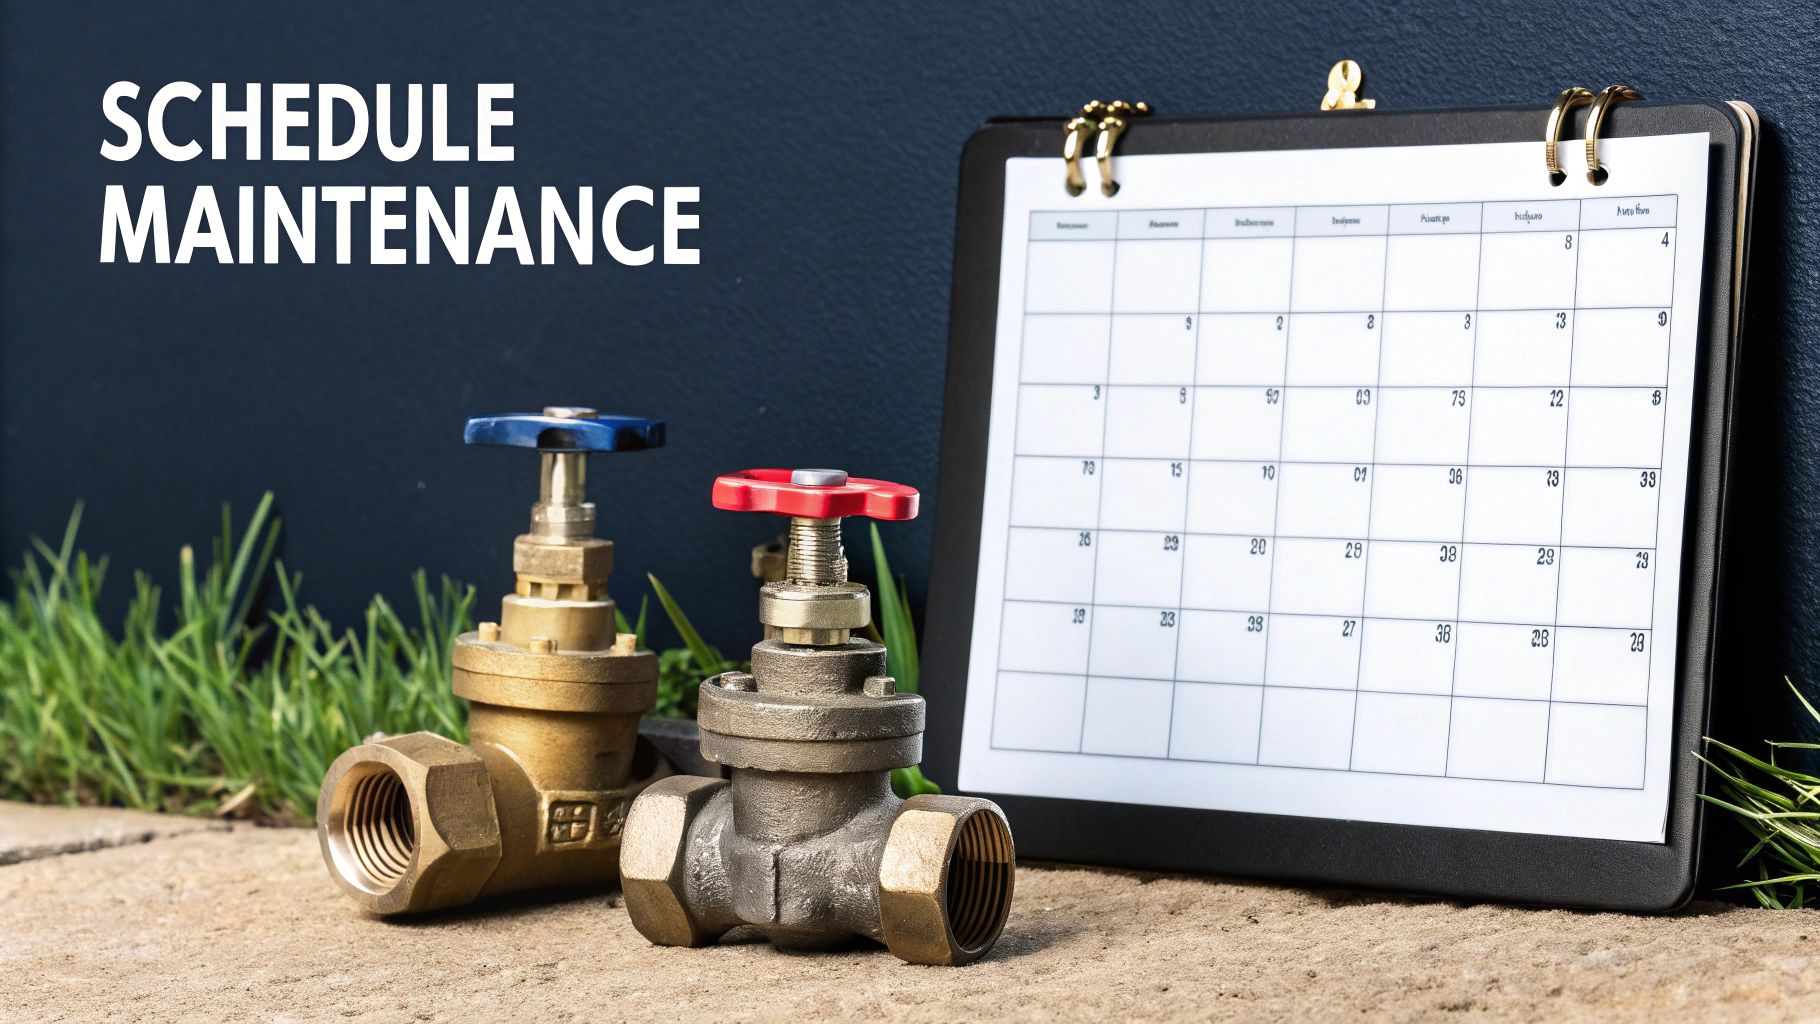
Finalizing Documentation and Optimizing Maintenance
The physical work might be done, but the inspection isn't really over until the paperwork is squared away. This final part of the process is where you turn all your hard work and observations into real, actionable intelligence. Getting a comprehensive report down on paper isn't just good practice; for pressure systems here in the UK, it’s a legal requirement and creates a historical record that is absolutely invaluable down the line.
Your report, built from the valve inspection checklist, should meticulously detail every single observation, measurement, and action you took. Be sure to log the final test pressures, any leakage results, and a list of all parts that were repaired or replaced. This document is your proof of compliance and, more importantly, the foundation for smarter maintenance planning.
Turning Data Into Actionable Intelligence
Once you have this solid data in hand, you can start to really fine-tune your inspection schedules. It’s all about working smarter, not harder.
For example, if you have a valve that has consistently passed inspections with flying colours, you might be able to cautiously extend its maintenance interval. This frees up your team’s valuable time and resources without ever compromising on safety. On the flip side, a valve that's always giving you trouble, especially one on a critical process, might need more frequent checks. This data-driven approach helps you move away from a reactive, 'fire-fighting' mentality to a proactive strategy of managing your assets.
A great real-world example of this comes from UK commercial vehicle operators. One case study involving a bus company, MacDonald Bus Ltd., showed how they analysed their fleet data and successfully extended inspection intervals from 28 to 42 days for their newer, more reliable buses. This included looking at safety-critical pressure valves. This single, data-backed decision eliminated about 300 inspections a year, letting them use their resources much more effectively while keeping safety standards high. It's a perfect illustration of how solid performance data can justify changes to your maintenance routines, a practice you can learn more about in the UK government's guide to maintaining roadworthiness.
Predicting Future Needs from Past Performance
When you start analysing trends from your historical reports, you gain an almost predictive ability. If you notice a particular model of valve in a specific service regularly needs its packing adjusted, you can get ahead of the problem and schedule that work proactively. This simple step can dramatically minimise unexpected downtime and helps you manage your maintenance budget more effectively.
A detailed inspection report is more than a record; it's a crystal ball. It allows you to look back at trends, predict future component failures, and shift your maintenance strategy from reactive repairs to proactive reliability.
By logging every detail, you’re building a powerful database over time. This historical context is essential when you're troubleshooting a particularly tricky issue or trying to make a case for upgrades. For instance, if your data clearly shows that certain pressure reducing valves consistently fail in a high-cycle application, you now have a solid business case for sourcing a more robust replacement.
If you'd like to learn more about the different options out there, you can explore our detailed guides on various pressure reducing valves available.
This final documentation step closes the loop on your valve inspection checklist, ensuring that every check you perform adds long-term value to your plant’s safety and efficiency.
Your Valve Inspection Questions Answered
Even with the most thorough checklist, you're bound to run into questions out in the field. It’s part of the job. We get calls from engineers and maintenance managers all the time, so we’ve put together answers to the most common queries we hear. Think of this as a practical Q&A to help you handle your valve inspections with more confidence.
How Often Should I Be Inspecting My Valves in the UK?
This is the big one, and the honest answer is: it depends. There’s no single timetable that fits every valve in every system. The right frequency comes down to a few key things.
First and foremost, you have to satisfy your legal obligations. The Pressure Systems Safety Regulations (PSSR) 2000 are clear about the need for periodic examinations. The exact schedule for this is laid out in a Written Scheme of Examination, which must be created and signed off by a "competent person."
Beyond the legal minimum, practical sense must prevail. You should consider:
- Service Conditions: A valve handling aggressive chemicals or cycling hundreds of times a day will need a much closer eye on it than one on a simple cold water line. Steam service, for example, is far more demanding than many other applications.
- Manufacturer’s Advice: Your OEM manual is your best friend here. The people who designed the valve provide baseline recommendations for a reason—it’s a great starting point.
- Your Own Records: Nothing beats real-world data. If you find a specific valve is already showing wear after 12 months, that's your cue to shorten the inspection cycle for that unit. Don't wait for it to fail.
As a rule of thumb, an annual inspection is a solid starting point for many systems. But you must adjust this based on risk and experience. A critical valve in a harsh environment might need quarterly checks, whereas a valve in a less demanding role might prove it can safely go longer between inspections.
What Is a “Pop Test” and When Is It Required?
A "pop test" is exactly what it sounds like—it’s a functional test specifically for pressure relief valves. You isolate the valve from the system and carefully apply pressure to the inlet until it ‘pops’ open at its designated set pressure. It’s the only way to be certain it will do its job during an overpressure event.
For any safety relief valve, this isn't just a good idea; it’s an essential safety verification. If that valve doesn’t open at the right pressure, it needs to be pulled from service for recalibration or replacement immediately. It's not just a maintenance task, it's a critical safety function. For most other types of valves, like ball or gate valves, a simple functional stroking test (fully opening and closing it) is the more relevant check.
What Are the Most Common Failure Points to Look For?
You learn from experience that certain parts of a valve are nearly always the first to cause trouble. By focusing your attention on these usual suspects, you can spot potential problems much faster.
Your top three areas to check are almost always:
- Gland Packing: The seal around the valve stem is a classic weak point. It’s constantly working and can harden, wear down, or loosen over time, leading to pesky leaks. Keep an eye out for any drips, stains, or build-up around the stem.
- Seat and Disc: These are the heart of the valve's seal. Any erosion from high-velocity flow, corrosion from the media, or damage from trapped debris will cause the valve to "pass"—meaning it won't shut off tightly.
- Gaskets: The gaskets sealing the valve to the pipework flanges can become brittle with age and temperature cycles. They lose their ability to seal properly, causing external leaks that are often easy to spot.
A high-quality steam pressure reducing valve will have very different wear patterns to a simple ball valve. Knowing what to look for on specific equipment is key, and you can get more targeted insights from our guide on specific steam pressure reducing valves. With the right care, a quality valve can give you 20 years of reliable service, but that only happens with consistent and knowledgeable upkeep.